There’s something magical about a crackling fire. It draws people together, provides warmth on a cool evening, and sets the stage for countless memories. Imagine having that focal point right in your own backyard. Building your own fire pit is more than just a weekend project; it’s an investment in your home’s comfort and social life. While it might seem like a daunting task, with the right guidance and a little bit of effort, you can create a beautiful and functional fire pit that will be the envy of your neighborhood.
This comprehensive guide will walk you through every step of the process. We’ll cover everything from choosing the perfect spot and gathering materials to the construction itself and long-term maintenance. By the end, you’ll have all the knowledge you need to build a safe, durable, and stunning fire pit.
Contents
Part 1: Planning and Preparation – The Foundation of a Great Fire Pit
Before you lift a single stone, proper planning is essential. Taking the time to prepare will save you headaches later and ensure your fire pit is both safe and legal.
Checking Local Regulations
First and foremost, check with your local authorities. Contact your city or county’s planning department, as well as your local fire department. Many municipalities have specific rules regarding open flames and backyard fire pits. These can include:
- Setback Requirements: Rules on how far the fire pit must be from your house, sheds, fences, property lines, and overhanging trees. A common rule is a minimum of 10-25 feet from any structure.
- Size and Type Restrictions: Some areas may have limits on the diameter and height of the fire pit.
- Permits: You might need to obtain a permit before starting construction.
- Burn Bans: Be aware of seasonal burn bans, especially in dry or windy climates.
Also, check with your homeowner’s association (HOA) if you have one, as they may have their own set of aesthetic and safety guidelines.
Choosing the Perfect Location
Once you know the rules, it’s time to pick the spot. An ideal location is:
- Open and Clear: Away from low-hanging branches, power lines, and your home’s siding.
- Level Ground: Building on a flat surface is crucial for stability. If your yard has a slope, you will need to level the area first.
- Wind Considerations: Try to place it in a spot that is somewhat sheltered from prevailing winds to prevent smoke from blowing into your seating area or towards your house.
- Accessible: Think about foot traffic. You want it to be easy to get to but not in the middle of a primary pathway.
Use a garden hose or spray paint to outline the potential shape and size of your fire pit on the ground. This will help you visualize the space it will occupy and how it fits with your overall backyard layout.
Part 2: Gathering Your Tools and Materials
With your plan in place, it’s time to go shopping. The materials you choose will define the look and longevity of your fire pit.
Essential Tools
You don’t need a professional workshop, but having these tools on hand will make the job much easier:
- Shovel (both a pointed and a flat-nosed spade)
- Tape Measure
- Level (a 4-foot level is ideal)
- Rubber Mallet
- Wheelbarrow
- Work Gloves
- Safety Glasses
- Garden Rake
- Caulking Gun (for construction adhesive)
Material Recommendations
The heart of your fire pit is the wall. You need materials that can withstand high temperatures and the elements.
- Wall Blocks: The most popular choice for DIY fire pits is concrete retaining wall blocks, often called “tumbled” or “rustic” blocks. They are durable, easy to work with, and come in various colors and shapes. Make sure the blocks you choose are rated for this purpose; regular concrete can crack or even explode when exposed to high heat. You can also use natural stone or fire-rated bricks.
- Fire Pit Insert (Optional but Recommended): A metal fire ring or insert provides a protective barrier between the fire and your masonry blocks. It extends the life of the blocks and provides a clean, finished look. They come in various sizes, so choose one first and build your pit around it.
- Gravel: You will need several bags of all-purpose gravel or crushed stone for the foundation. This creates a stable, well-draining base.
- Sand or Lava Rocks: This will form the base layer inside your pit, raising the fire off the ground and aiding drainage. Lava rocks are excellent for radiating heat.
- Construction Adhesive: Use a heavy-duty, fire-rated construction adhesive to secure the layers of your blocks together.
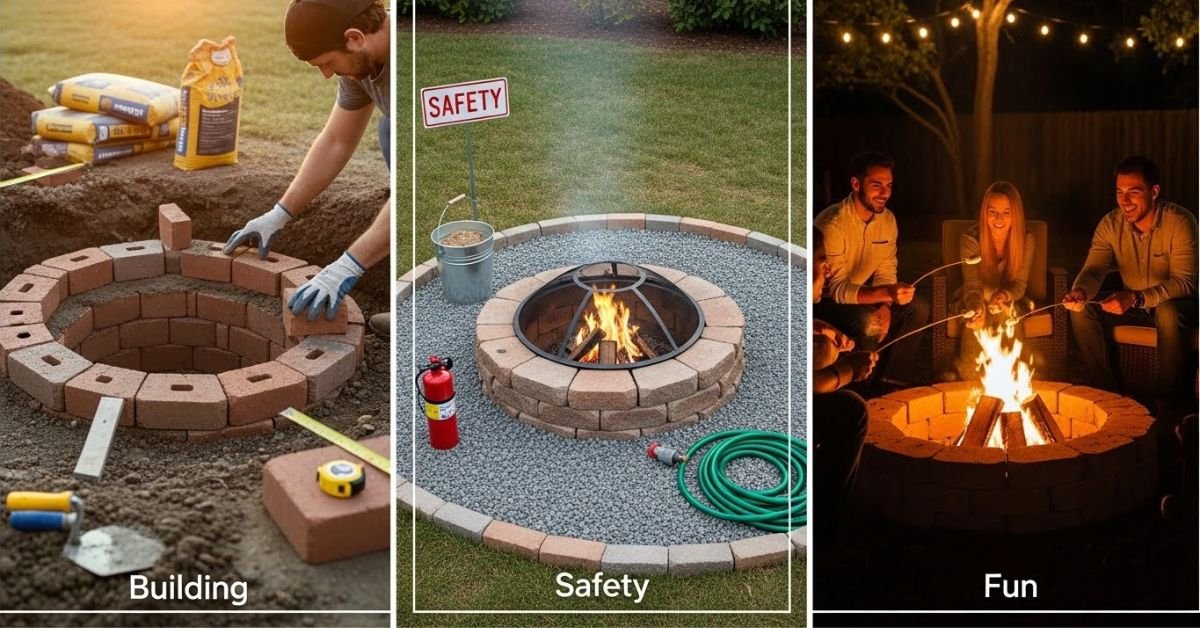
Part 3: Step-by-Step Construction
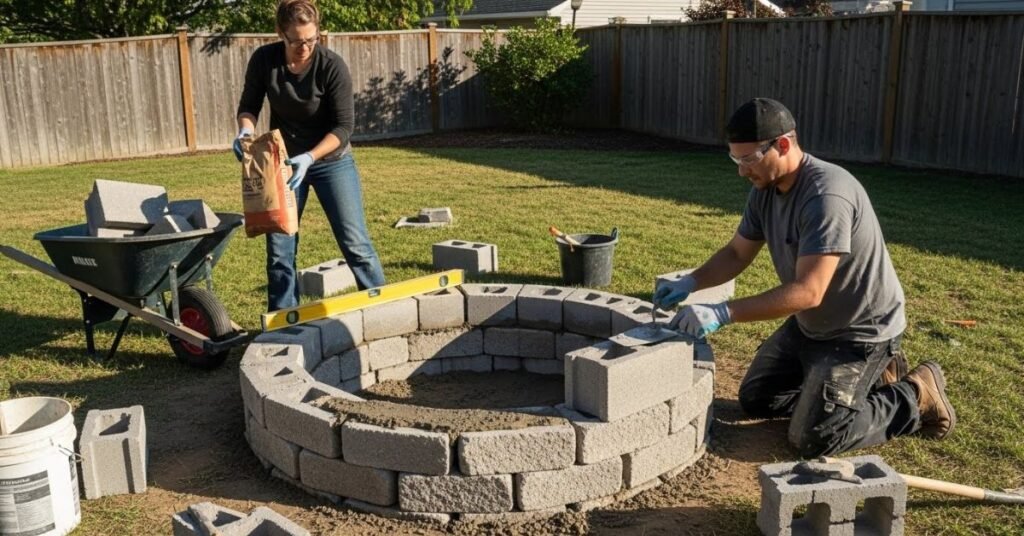
This is where the vision comes to life. Set aside a weekend for this project. Work at a steady pace and double-check your measurements as you go.
Step 1: Prepare the Base
Mark the center of your fire pit with a stake. If you are building a 4-foot diameter pit, tie a 2-foot string to the stake and use it as a compass to mark a perfect circle with spray paint.
Using a shovel, dig out the sod and soil within this circle to a depth of about 6-8 inches. It’s crucial that the bottom of this trench is perfectly level. Use your level to check it from multiple directions. Tamp the soil down firmly.
Step 2: Add the Gravel Foundation
Pour a 4-inch layer of gravel into the excavated area. Spread it evenly with a garden rake. Use a hand tamper or a heavy piece of wood to compact the gravel until it is firm and level. Check for levelness again. This solid foundation prevents your fire pit from shifting over time.
Step 3: Lay the First Course of Blocks
Place your first layer of blocks on top of the gravel foundation, following the circular outline. Fit them tightly against each other. If you are using a metal insert, place it in the center to ensure your blocks are arranged correctly around it.
Use your level across the tops of the blocks to ensure this first course is perfectly even. This is the most important layer. Use the rubber mallet to gently tap blocks down to adjust their height until the entire ring is level.
Step 4: Build Up the Walls
Remove the metal insert for now. Apply a generous bead of construction adhesive to the top of the first course of blocks.
Begin laying your second course. Stagger the joints, just like with brickwork, for added strength and a more professional look. This means the center of each block on the second course should sit over the seam between two blocks on the first course. Press each block down firmly.
Check for level and plumb (vertical straightness) as you add each block. Continue this process for each subsequent course until you reach your desired height, typically 3-4 courses high (12-16 inches).
Step 5: Finishing Touches
For the final course, you can use special capstones for a smooth, finished top surface. Secure them with construction adhesive. Let the adhesive cure for at least 24-48 hours, or as directed by the manufacturer, before using the fire pit.
Once the adhesive is cured, place your metal insert back into the center of the pit. Fill the bottom of the pit (inside the insert) with 2-3 inches of sand or lava rocks. This protects the ground below and improves drainage.
Part 4: Fire Pit Safety and Maintenance
A fire pit is a wonderful feature, but safety must always be your top priority.
Safety First
- Never leave a fire unattended.
- Keep a bucket of water, a garden hose with a nozzle, or a fire extinguisher nearby at all times.
- Don’t use accelerants like gasoline or lighter fluid to start your fire. Use dry kindling and a fire starter.
- Avoid burning softwoods like pine, which can pop and throw sparks. Use hardwoods like oak or hickory.
- Be mindful of wind conditions. Do not light a fire on a very windy day.
- Keep children and pets at a safe distance from the fire.
- Ensure the fire is completely extinguished before you leave it. Douse the embers with water until the hissing stops.
Long-Term Maintenance
To keep your fire pit looking great for years, perform some simple maintenance:
- Clean Out Ashes: Regularly scoop out cooled ashes to maintain good airflow.
- Inspect the Structure: Periodically check the blocks for any cracks or shifting.
- Cover It: Use a weather-resistant cover during the off-season to protect it from rain, snow, and debris. This will prevent water from collecting and freezing, which can damage the blocks.
Part 5: Enjoying Your New Backyard Oasis
Congratulations, you’ve built your own fire pit! Now for the fun part. A fire pit is more than just a source of warmth; it’s a social hub. Here are some creative ways to enjoy your new backyard feature:
- Classic S’mores Night: Gather graham crackers, marshmallows, and chocolate for a timeless treat that everyone loves.
- Outdoor Movie Night: Set up a projector and screen and enjoy a movie under the stars, with the fire pit providing ambiance and warmth.
- Acoustic Jam Session: Encourage friends with musical talents to bring their guitars for a cozy, unplugged performance.
- Gourmet Campfire Cooking: Go beyond hot dogs. Use a grill grate to cook steaks, burgers, or vegetable skewers over the coals. A cast-iron skillet placed on a grate is perfect for making everything from chili to cornbread.
- Storytelling Circle: Turn off the phones and share ghost stories or fond memories. The flickering flames create the perfect atmosphere for conversation and connection.
Building your own fire pit is a rewarding project that adds value, beauty, and a unique gathering spot to your home. With careful planning and a bit of weekend work, you can create a centerpiece for your backyard that will host warm memories for years to come.